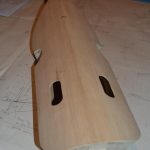
Having got the top nicely smooth, it’s time to cut some holes in it. Knowing how much work has gone into making it so far, this is a bit daunting – but it has to be done!
I measured carefully and drew up the sound holes (the two big ones, and the small ones under the keybox), and started drilling. Again, this showed me how brittle this old wood it – hopefully it will sound OK, but it does have the tendency to chip, so I have had to make one or two tiny repairs around the main sound holes, and will need to apply a couple of cleats (as I understand they are called in the luthier’s world!) on a short crack. The top is a bit thinner than I’d expected (more like 3mm rather than 4) – clearly my planing wasn’t as even as I thought, and it’s a bit thicker at the ends; however thin(ish) ought to be good if it’s not too thin!
Here’s the “bass” bar being glued on:

Finally – time to glue the top on. I made up a set of clamps (to cover six positions along the top) again using the frame originally used as a steaming clamp. These can be set in place with three sets of screws. Additionally, clamps are used at each end to pin the top in place properly. Complicated, and it took quite a while to set up. It’s just as well the Titebond hide glue doesn’t go off very quickly.
So here it is:

Well, after letting the glue cure overnight, all seems to be well. The joint appears to be closed properly all round, so the corners can be cut off next.

After trimming the corners, it really looks like a kontrabas nyckelharpa!

Now there’s some more careful shaping to do on the edges before I fit the sound post. In spite of the top being a bit on the thin side, it feels very strong. Let’s hope it is!
Final shaping was done mostly with 80 grit sandpaper on various shaped formers. It’s looking OK:

More views, with headstock: